GCEの無料枠を使って個人用Mastodonを立てる
分散型マイクロブログのMastodonが「次世代のTwitter」というように注目を集めています。 Google Cloud Platform (GCP) の無料枠を利用して、Mastodonの自分用インスタンスを無料で運用する試みとその記録です。
VMの用意
まずはVMを起動します。2017/04/16現在、無料枠の対象はUSのリージョンに限られているので日本から最も近いと思われる西海岸のリージョンを選びます。
OSのイメージは、現状Docker側がUbuntu 17.04を正式にサポートしていないので、一つ前のUbuntu 16.10にします。

デフォルトでは外部アクセス用のグローバルIPがエフェメラル(可変)なので、固定のIPを設定しておきます。

DNSの設定で、mastodon.example.comからGCEの固定IPに向いたAレコードを追加します。
今回はvalue-domainで取得したドメインを使用しましたが、DNSの設定の詳細は省略します。
> gcloud compute ssh mastodon --zone us-west1-a
Dockerインストール
今回はMastodonをDockerの上で動かすことにするので、まずDocker CEをインストールします。
基本的にはDocker公式のインストールマニュアルに沿って進めます。 docs.docker.com
Dockerリポジトリの設定
必要なパッケージのインストール
$ sudo apt-get install \
    apt-transport-https \
    ca-certificates \
    curl \
    software-properties-common

Reading package lists... Done
Building dependency tree
Reading state information... Done
ca-certificates is already the newest version (20160104ubuntu1).
software-properties-common is already the newest version (0.96.24.7).
apt-transport-https is already the newest version (1.3.4).
curl is already the newest version (7.50.1-1ubuntu1.1).
0 upgraded, 0 newly installed, 0 to remove and 0 not upgraded.
既にインストールされている模様。
Docker公式のGPGキーの追加
$ curl -fsSL https://download.docker.com/linux/ubuntu/gpg | sudo apt-key add -
OK
$ sudo apt-key fingerprint 0EBFCD88
pub   rsa4096 2017-02-22 [SCEA]
      9DC8 5822 9FC7 DD38 854A  E2D8 8D81 803C 0EBF CD88
uid           [ unknown] Docker Release (CE deb) <docker@docker.com>
sub   rsa4096 2017-02-22 [S]
フィンガープリントが正しいことを確認します。
stableリポジトリの設定
AMD64とARM用の設定が載っていますが、GCEはIntelのCPUを使用しているのでAMD64のコマンドを実行します。
$ sudo add-apt-repository \
    "deb [arch=amd64] https://download.docker.com/linux/ubuntu \
    $(lsb_release -cs) \
    stable"
Docker本体のインストール
パッケージインデックスの更新
$ sudo apt-get update
Hit:1 http://us-west1.gce.archive.ubuntu.com/ubuntu yakkety InRelease
Get:2 http://us-west1.gce.archive.ubuntu.com/ubuntu yakkety-updates InRelease [102 kB]
(略)
Get:34 http://security.ubuntu.com/ubuntu yakkety-security/multiverse amd64 Packages [2,832 B]
Fetched 10.6 MB in 2s (3,696 kB/s)
Reading package lists... Done
Docker CEのインストール
今回は商用ではないので、特定のバージョンは指定せず最新版をインストールします。
$ sudo apt-get install docker-ce
Reading package lists... Done
Building dependency tree
Reading state information... Done
The following additional packages will be installed:
  aufs-tools cgroupfs-mount libltdl7
The following NEW packages will be installed:
  aufs-tools cgroupfs-mount docker-ce libltdl7
0 upgraded, 4 newly installed, 0 to remove and 27 not upgraded.
Need to get 21.1 MB of archives.
After this operation, 106 MB of additional disk space will be used.
Do you want to continue? [Y/n] y
Get:1 http://us-west1.gce.archive.ubuntu.com/ubuntu yakkety/universe amd64 aufs-tools amd64 1:3.2+20130722-1.1ubuntu1 [92.9 kB]
(略)
Processing triggers for ureadahead (0.100.0-19) ...
Processing triggers for libc-bin (2.24-3ubuntu2) ...
Processing triggers for systemd (231-9ubuntu3) ...
ついでに他のパッケージも更新しておきます。
$ sudo apt-get upgrade
Dockerの動作確認
hello-worldコンテナを起動して動作確認をします。
sudo docker run hello-world
Unable to find image 'hello-world:latest' locally
latest: Pulling from library/hello-world
78445dd45222: Pull complete
Digest: sha256:c5515758d4c5e1e838e9cd307f6c6a0d620b5e07e6f927b07d05f6d12a1ac8d7
Status: Downloaded newer image for hello-world:latest

Hello from Docker!
This message shows that your installation appears to be working correctly.

To generate this message, Docker took the following steps:
 1. The Docker client contacted the Docker daemon.
 2. The Docker daemon pulled the "hello-world" image from the Docker Hub.
 3. The Docker daemon created a new container from that image which runs the
    executable that produces the output you are currently reading.
 4. The Docker daemon streamed that output to the Docker client, which sent it
    to your terminal.

To try something more ambitious, you can run an Ubuntu container with:
 $ docker run -it ubuntu bash

Share images, automate workflows, and more with a free Docker ID:
 https://cloud.docker.com/

For more examples and ideas, visit:
 https://docs.docker.com/engine/userguide/
Dockerコマンドをroot以外のユーザで実行できるようにする
以下は公式マニュアルのインストール後の手順に沿って進めます。 docs.docker.com
$ sudo groupadd docker
groupadd: group 'docker' already exists
$ sudo usermod -aG docker $USER
$ docker run hello-world
(結果はDockerの動作確認と同一のため略)
Dockerの自動起動設定
マニュアルにはsystemdとupstartの設定が掲載されていますが、Ubuntu 16.04以降なのでsystemdの設定を行います。
$ sudo systemctl enable docker
Synchronizing state of docker.service with SysV service script with /lib/systemd/systemd-sysv-install.
Executing: /lib/systemd/systemd-sysv-install enable docker
Docker Composeのインストール
Docker Composeのリリースページにあるインストールコマンドを実行します。/usr/local/binの書き込みが必要なので、あらかじめrootになっておきます。
github.com
$ sudo -i
# curl -L https://github.com/docker/compose/releases/download/1.12.0/docker-compose-`uname -s`-`uname -m` > /usr/local/bin/docker-compose
  % Total    % Received % Xferd  Average Speed   Time    Time     Time  Current
                                 Dload  Upload   Total   Spent    Left  Speed
100   600    0   600    0     0    633      0 --:--:-- --:--:-- --:--:--   633
100 8076k  100 8076k    0     0  1642k      0  0:00:04  0:00:04 --:--:-- 2279k
# chmod +x /usr/local/bin/docker-compose
# exit
logout
Mastodonのインストール
MastodonのGitHubからソースをcloneします。 github.com
$ git clone https://github.com/tootsuite/mastodon.git
Cloning into 'mastodon'...
remote: Counting objects: 26487, done.
remote: Compressing objects: 100% (43/43), done.
remote: Total 26487 (delta 14), reused 0 (delta 0), pack-reused 26444
Receiving objects: 100% (26487/26487), 34.47 MiB | 41.69 MiB/s, done.
Resolving deltas: 100% (15992/15992), done.
Checking connectivity... done.
cd mastodon
Readme.mdの "Running with Docker and Docker-Compose" に沿って進めます。
まずはdocker-compose.ymlの内容を確認します。readmeにもある通り、PostgreSQLとRedisのファイルを永続化する設定がコメントアウトされているので、それぞれ(8, 9, 15, 16行)行頭の#を外して保存されるようにします。
次は環境変数の設定ファイルを作成します。その中には自動生成されたシークレットを設定する項目が3つあるので、ファイルを編集する前に生成しておきます。buildは初回のみ実行します。
すると、RAMが0.6GBと少ないこともあり、Out of Memoryでビルドが中断してしまうので、スワップファイルを作成することにします。
$ sudo fallocate -l 2G /swap
$ sudo chmod 0600 /swap
$ sudo mkswap /swap
Setting up swapspace version 1, size = 2 GiB (2147479552 bytes)
no label, UUID=
$ sudo swapon /swap
/etc/fstabに下記の行を追記し、再起動後もスワップ領域が有効になるようにします。
/swap swap swap defaults 0 0
コマンドを実行するとシークレット値が表示されるので、それぞれコピーしておきます。
$ docker-compose build
$ docker-compose run --rm web rake secret
$ docker-compose run --rm web rake secret
$ docker-compose run --rm web rake secret
既存のサンプルファイルをコピーして編集します。
cp .env.production.sample .env.production
# Service dependencies
REDIS_HOST=redis
REDIS_PORT=6379
# REDIS_DB=0
DB_HOST=db
DB_USER=postgres
DB_NAME=postgres
DB_PASS=
DB_PORT=5432

# Federation
LOCAL_DOMAIN=example.com # 使用する独自ドメインに変える
LOCAL_HTTPS=false # 動作確認ではHTTPSを使用しない

# Use this only if you need to run mastodon on a different domain than the one used for federation.
# Do not use this unless you know exactly what you are doing.
WEB_DOMAIN=mastodon.example.com # 今回使用するドメインはMastodon専用のドメインではないので、サブドメイン込みのWebアクセス用ドメインを設定する。

# Application secrets
# Generate each with the `rake secret` task (`docker-compose run --rm web rake secret` if you use docker compose)
PAPERCLIP_SECRET= #生成したシークレット
SECRET_KEY_BASE= #生成したシークレット
OTP_SECRET= #生成したシークレット

# Registrations
# Single user mode will disable registrations and redirect frontpage to the first profile
SINGLE_USER_MODE=true # シングルユーザモードを有効にする
# Prevent registrations with following e-mail domains
# EMAIL_DOMAIN_BLACKLIST=example1.com|example2.de|etc
# Only allow registrations with the following e-mail domains
# EMAIL_DOMAIN_WHITELIST=example1.com|example2.de|etc

# Optionally change default language
DEFAULT_LOCALE=ja #デフォルトの言語を日本語に変更する

# E-mail configuration
# Note: Mailgun and SparkPost (https://sparkpo.st/smtp) each have good free tiers
SMTP_SERVER=smtp.gmail.com # G Suiteで作成した専用アカウントを使用。
SMTP_PORT=587
SMTP_LOGIN=mastodon
SMTP_PASSWORD=
SMTP_FROM_ADDRESS=mastodon@example.com
#SMTP_DELIVERY_METHOD=smtp # delivery method can also be sendmail
#SMTP_AUTH_METHOD=plain
#SMTP_OPENSSL_VERIFY_MODE=peer
#SMTP_ENABLE_STARTTLS_AUTO=true

(以下、AWS S3の設定等はしないので略)
続いてデータベースの初期化をします。
$ docker-compose run --rm web rails db:migrate
Migrating to CreateAccounts (20160220174730)
== 20160220174730 CreateAccounts: migrating ===================================
-- create_table(:accounts, {})
   -> 0.0099s
-- add_index(:accounts, [:username, :domain], {:unique=>true})
   -> 0.0050s
=
(略)
次はアセットのプリコンパイルです。
$ docker-compose run --rm web rails assets:precompile
I, [2017-04-16T18:01:17.943110 #1]  INFO -- : Writing /mastodon/public/assets/application_public-ff92fbfb31a9056b294415acf2190bf7a5ab47eb875ad7863ec82171915654bc.js
(略)
一度コンソールにログが出る状態でMastodonを起動します。
$ docker-compose up
mastodon_db_1 is up-to-date
mastodon_redis_1 is up-to-date
(略)
web_1        | [1] Puma starting in cluster mode...
web_1        | [1] * Version 3.8.2 (ruby 2.4.1-p111), codename: Sassy Salamander
web_1        | [1] * Min threads: 5, max threads: 5
web_1        | [1] * Environment: production
web_1        | [1] * Process workers: 2
web_1        | [1] * Preloading application
web_1        | [1] * Listening on tcp://0.0.0.0:3000
web_1        | [1] Use Ctrl-C to stop
web_1        | [1] - Worker 0 (pid: 14) booted, phase: 0
web_1        | [1] - Worker 1 (pid: 16) booted, phase: 0
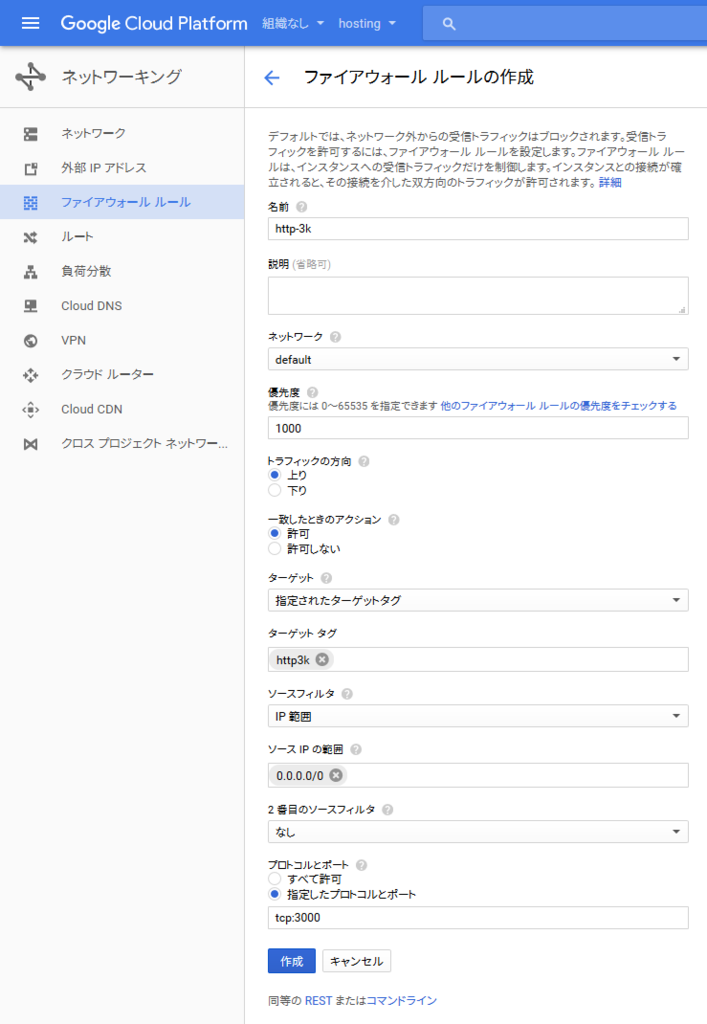
GCEのデフォルトではポート3000は閉じているので、TCP:3000を開くファイアウォールルールを作成します。

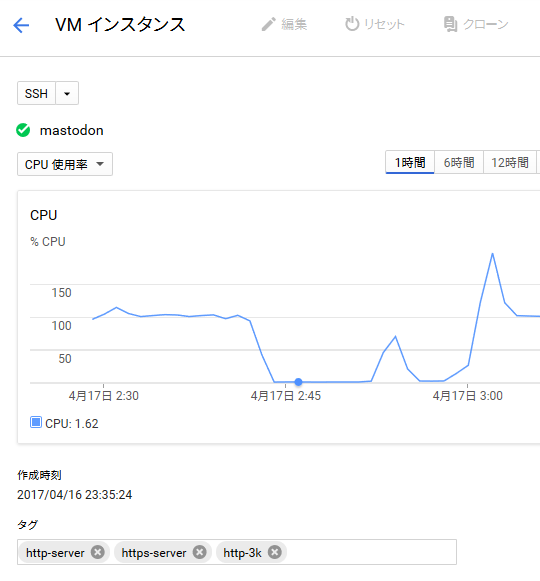
GCEのインスタンスの編集画面を開き、ファイアウォールルールで設定したタグを追加します。

ブラウザで http://mastodon.example.com:3000/ を開き、登録画面が出ることを確認します。
現状HTTPを使用する設定なので、平文のパスワードがインターネットに流れないよう登録はHTTPS対応の後にします。

デーモンプロセスとして起動するには-dオプションを付けて再度起動します。
$ docker-compose up -d
# ログを見るには
$ docker-compose logs
ToDo
- Let's Encrypt でサーバ証明書取得
- nginxを通してHTTPS化 cf. https://github.com/tootsuite/documentation/blob/master/Running-Mastodon/Production-guide.md